Don’t rush out and buy that new Oculus Quest controller just yet, keep reading to get that controller powered back on.
Why Won’t My Oculus Controller Turn On?
Playing your virtual reality game might be a tad bit difficult without a working controller. If your Oculus Quest 2 controller isn’t powering on its most likely one of four things. A bug has gotten into your system, the battery is out of juice, your VR’s Firmware is out of date or the device itself has hardware damage. Each reason is explained below in detail with suggested ways to get your controller functioning properly again.
1. Bug
Bugs in any device’s operating system will wreak havoc on the device and destroy a user’s experience with virtual reality. A bug can infect the Oculus Quest the same way it infects any other electronic device, through apps and games downloaded by the user or system updates downloaded by facebook reality. Either way the quickest reaction is the best reaction because having a bug on the operating system will cause the headsets features to malfunction. Fix 1 – Wait For Them to Turn On The option to be patient and wait for any system kinks or bugs to be worked out by the company on its own. If this is the strategy you’re going with patience and the process of elimination is key to your success. If the bug inside Oculus Quest 2 is not a software bug caused by the network’s updates but an internal problem, waiting won’t fix the controller. If you have waited for 48 hours or more, move onto the next fix for getting rid of a bug on your VR device. Fix 2 – Unpair and Pair Again Sometimes a connection gets lost somewhere if you’ve had your controller paired to the headset for a long period of time. A quick fix to this problem is to unpair the controller from the headset and then pair them again. In order to unpair the Oculus Quest 2 you have to factory reset your headset and controller. To learn how to factory reset your headset and unpair your controller follow these instructions. You will need to access the Oculus Quest app on your phone in order to unpair it from the headset.
- Open up your Oculus Quest app and find the Settings Menu. Once you’re under the settings menu tap on the Devices Icon to locate your headset.
- Once you have located the headset you want to unpair. From this screen tap on Advanced Settings Menu and select Reset the Headset.
- Tap Reset to confirm a factory reset of the Oculus Quest 2 headset. When the restart is complete your controller should no longer be paired to the headset, and the headset is back to its default settings. To pair your headset back to your controller follow these instructions using your phone’s bluetooth and the Oculus Quest App. Make sure your phone’s bluetooth is on and that the VR headset is kept close to your device so a strong connection can be made.
- Open the app and select Devices, then tap the headset you want to pair. The process is automatic from here and shouldn’t take more than 10 seconds to completely finish pairing. Fix 3 – Unpair and then Reconnect Controller Using the Oculus App Follow these steps to unpair your controller and connect it using the Oculus App.
- Open the Oculus Quest App on your phone.
- On the bottom menu, tap Devices.
- Once under the Devices Menu, click on the image of the headset you are currently using.
- Next under the Devices Menu, tap the Controllers Menu.
- Once you’re under the Controllers Menu click on the controller you want to disconnect from the headset and then tap on the Controller you want to pair. Fix 4 – Restart The Quest Headset Have you tried unpairing and pairing your headset multiple times? Are you still sitting on a controller that won’t power on, preventing you from using your VR headset? If the above tips and fixes aren’t helping the next step is to restart your Oculus Quest headset and see if that does the trick. To restart the Quest headset all you need to do is hold down the power button and the volume down button simultaneously for at least 10 seconds. The reboot screen to appear and begin loading on your headset, Once you can access the reboot screen use the volume buttons to highlight Factory Reset and press the power button to confirm the reset. Fix 5 – Restart Oculus Quest 2 You restarted and factory reset your Quest headset, now the time has come to restart and factory reset your Oculus Quest 2. When you want to reset Oculus Quest 2 you have to do this through the app on your android device.
- Once you have opened up the App in your phone tap the Devices menu.
- Under devices, tap on your Quest.
- Next, you’re going to click on Advanced Settings.
- From the advanced settings menu tap Factory Reset.
- Once you have highlighted and clicked on factory reset make sure you click the RESET button to confirm the action. If you do not tap RESET, the app will not complete the restarting and resetting of your Oculus Quest 2.
2. Battey Issue
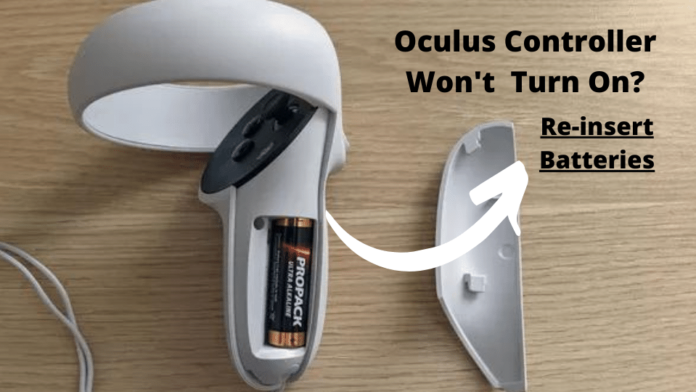
Just like your phone, laptop and computer if the Oculus Quest doesn’t have a charged battery its not going to power on. The same applies to the batteries for your Quest controller. If you’re having trouble getting the controller to power on, one of the first things you should check to see is if your batteries are dead. The controller takes plain old disposable batteries that need to be replaced once they die. The Oculus Quest 2 headset was designed with a rechargeable lithium battery. The headset is powered by a 3640mAh rechargeable lithium-ion battery pack, a 14 watt-hour rating powers the headset. This is a single cell battery that weighs about 63 grams and has 3.85 volts of power. This shelf life depends on the activities the Oculus Quest is being used for. Certain games will drain the battery faster than watching a movie would. There are two options when batteries fail in the controller or headset of an Oculus Quest, keep reading for ways to get your virtual reality experience up and running again. Fix 1 – Reinsert Batteries As basic and obvious as this might be, try taking the batteries out of the Oculus Quest controller and then putting them back in. Sometimes the batteries get loose and the connection is too weak to power the controller. A task as simple as checking to make sure the batteries are nice, tight, snug, and secure can save you a lifetime of aggravation with your electronic devices. The headset takes rechargeable batteries but that doesn’t mean it can’t cause problems. Since the headset is charged with a USB cord like your cell phone, check and make sure the cord that connects the headset to the charger is securely connected. If your battery has a full charge the indicator light on the headset should be green. The light is orange when the battery has no life and needs to be charged. Fix 2 – Replace Batteries If you take the batteries out and put them back in but you’re still seeing a powered off controller, it might just be time to replace the batteries altogether, The Oculus Quest 2 controller takes disposable double A batteries. These batteries can be bought online or at your local supermarket. There is no specific brand the controllers take but different brands have different shelf lives. Purchasing rechargeable batteries and a charging port for your controller is an option that will save you time and money in the long run.
- To change the batteries in your controller hold the controller with the eject symbol facing up.
- Slide the eject compartment upwards and outwards to pop it open.
- Once the compartment is open remove the old AA batteries and replace them with the new AA batteries.
- Turn your controller on and enjoy your Oculus Quest 2 virtual reality experience.
3. Firmware Out of Date
Just like your computer runs on software and your phone has an operating system, the Oculus Quest 2 has a system called Firmware that keeps VR features working correctly. If the firmware has not been updated, then it has not had its system cleaned for bugs, glitches, and hardware problems. The firmware plays an important role in keeping the virtual reality stimulation running smoothly.
- You can check and see what version of software your Oculus is running off of by clicking the Settings button on the bottom navigation bar on the Oculus Quest.
- Once you’re in the settings menu click the See All button which will bring up the full menu.
- Under the full menu locate and click on the About button. The first item listed under the About column is your software version.
- To see if this is the latest version Oculus has to offer take a quick look at the Oculus Release Notes page where they post new information about Oculus Quest. If the build number on the Release Notes pages matches the build number on your About page than the latest version of Firmware is already on your Oculus Quest. If it is lower or higher than the build number under your about tab, the firmware your using is out of date and could be the reason your having controller issues. Fix 1 – Update Firmware Most of the time the Oculus Quest will automatically update its firmware system the same way your android updates its operating system. However, sometimes this system fails and you need to manually go in and update your Oculus Quest firmware.
- To check and see if any updates are available go to the settings on the Oculus navigation bar.
- Find the See All button on the navigation bar and click it to bring up the full menu Locate the About tab under the full menu and click on it.
- Across from where your software version is located, you should find a button on the right-hand side.
- Click the button to check for firmware updates. The screen will either say No Updates available or Updates Available.
- If any updates are available click on the button to download the updated firmware version. When the download finishes your Oculus Quest should automatically restart and install the software update, If there are no available updates you just have to wait it out and use the firmware installed on your system. Oculus sends out automatic updates periodically, there really is no schedule to the system updates.
4. Hardware Damage
A hardware error is when something is wrong inside the Oculus Quest headset, and until it’s fixed the device won’t run correctly. If hardware issues are the problem with your Quest an error message will be displayed on your screen. The message will explain to the user why they have been prevented from entering virtual reality and that a hardware issue has been detected. The message prompts the user to make sure the VR headset and sensor are securely connected. Any loose connections will prevent the VR headset from working. Does your Quest controller have hardware damage? The controllers tracking can become loose from dirty senses on the device. Uneven lighting and a low battery can also cause hardware issues with the controller, Unstable WiFi connections will cause the controller to malfunction and the headset to unpair, Keep reading for some quick tips on how to solve the Oculus Quest controller hardware problems Fix 1 – Replace Controllers Fix 2 – Reach Out to Oculus Support Reaching out to Oculus customer support is an option that is always on the table. If you have tried every tip, check out what Oculus Quest customer support can do to help you. You can contact the Oculus Quest support team by visiting business.oculus.com. Their website offers helpful articles on how to troubleshoot their product with technical services offered. They have a technical support team that can be reached by opening up a support ticket with the Device Manager App.
How to Prevent Oculus Controller From Not Turning On
If you’re wondering if there are ways to keep your Oculus Quest controller from becoming damaged and malfunctioning? The answer is yes, there are a few simple steps you can take to keep your controller updated, clean and functioning the way it’s meant to. The Oculus Quest isn’t much fun with a broken run-down controller that’s giving you nothing but trouble. Keep reading for 3 easy ways to keep your Oculus Quest controller powered on and working better than it ever has before. Fix 1: Keep Controller Up to Date Updating your Oculus Quest controller is just as important as updating the headset if you want to keep the controller working smoothly. To update your Oculus Quest controller follow these four simple steps.
- Press on the right touch controller to pull up the navigation menu
- Hover over the clock on the left side of the navigation menu
- While hovered over the navigation menu, locate the settings tab on the top right corner of the menu
- Once you’re under the settings menu, select system, then tap the software update button from the left drop menu. After performing the last step make sure you press okay to confirm the system update for your controller. The controller will automatically update and restart once the process is complete. Fix 2 – Don’t Use Low-quality batteries The Oculus Quest 2 controller might take any kind of double A batteries, genetic brand or not and it will work all the same. The difference between high quality and low quality batteries is the low temperature performance and what material they are made from. There are three types of batteries, Alkaline, NiMH, and Lithium-ion. Alkaline are the cheapest batteries on the market and the most generic. They are difficult to recycle and won’t give you any warning before they lose their charge. NiMH batteries are more expensive than alkaline and get about 500 charges before they degrade. The NiMH battery will give you less power as its life is depleting, therefore giving you some kind of warning that your batteries need to be replaced before they completely lose their charge. Lithium Ion batteries are the newest and most reliable battery on the market. They are rechargeable disposable batteries, meaning they can be charged and reused twice before they are permanently dead. These are the batteries I recommend using in your Oculus controller, better on your wallet with more uses before needing to be replaced, these batteries will help keep your controller running smoother for longer. Fix 3 – Don’t Hit Controllers Out of Rage Obvious as it may seem, hitting your controller out of anger will not keep it from malfunctioning. When you smack, hit, bang or throw your controller you risk uncontrollable buzzing and possibly irreversible damage. When you’re trying to relax and enjoy your Oculus Quest and the controller just won’t cooperate, the rage you feel can get the best of you, causing you to damage the controller more than it was to begin with.
Conclusion
If you’re having consistent trouble with your Oculus Quest 2 virtual reality controller, use this article to troubleshoot the problem and get it solved. Outdated firmware, dirty sensors, dead batteries or broken hardware can all be the reasons behind a malfunctioning controller. Check your Quest controller for loose or dead batteries before you throw the controller out of rage. Update your Oculus Quest 2 controller regularly and keep the touchpad clean for a smoother virtual reality playing experience. Not sure when you should update your controllers firmware, check the Oculus website for software updates regularly.